Skip to content
Introduction
When it comes to providing care for individuals with limited mobility, the right equipment can make all the difference. TLC Home Mobility takes center stage in this endeavor, offering patient lifts and slings that prioritize safety, comfort, and dignity. In this step-by-step guide, we will take a closer look at the intricacies of using patient lifts and slings, shedding light on the process while showcasing the diverse range of products offered by TLC Home Mobility.
Overview of Patient Lifts
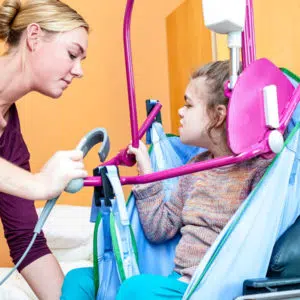
Patient lifts / Hoyer Lifts for home are the backbone of caregiving, and TLC Home Mobility understands the importance of having a variety of options to suit different needs. Their patient lifts boast cutting-edge features and designs that ensure safe and efficient transfers for individuals with varying levels of mobility.
Overview of Slings
In tandem with patient lifts, slings play a crucial role in providing the necessary support for seamless transfers. TLC Home Mobility’s extensive selection of slings is designed to cater to diverse needs, ensuring that caregivers can choose the most suitable option for personalized and comfortable care.
Types of Patient Lifts
1. Lift Type 1: Patient Lifts
Lift Type 1 from TLC Home Mobility is a versatile solution suitable for a wide range of patient transfers. Equipped with an ergonomic design, adjustable height settings, and user-friendly controls, this patient lift ensures a secure and efficient lifting process, adapting to various caregiving scenarios.
2. Lift Type 2: Home Mobility Lifts
Lift Type 2 is thoughtfully designed with the home environment in mind. With a compact footprint, easy maneuverability, and a whisper-quiet operation, this lift seamlessly integrates into residential settings. Its versatility makes it an ideal choice for daily transfers within the comfort of home.
3. Lift Type 3: Lift Systems
Lift Type 3 represents the pinnacle of lift systems, offering advanced features for specific needs. With features such as intelligent weight distribution, smooth acceleration and deceleration, and programmable settings, this lift system ensures optimal safety and functionality, particularly in demanding caregiving situations.
Step-by-Step Guide: How to Use a Patient Lift
Step 1: Preparing the Lift
Begin by conducting a thorough check of the patient lift. Ensure that all components are securely attached, and there are no signs of wear and tear. Verify that the lift’s controls are functioning correctly and that the emergency stop mechanism is operational.
Step 2: Positioning the Patient
Gently guide the patient into a comfortable and centered position, considering their specific needs. Clear the surrounding area of any obstacles, creating a safe space for the transfer. Adjust the lift’s base to provide stability during the process.
Step 3: Engaging the Lift
Activate the lift’s controls, slowly lifting the patient to a point just above the transfer surface. Ensure the patient is comfortable and secure before proceeding to the next step. Use the appropriate sling to provide additional support if necessary.
Step 4: Lifting the Patient
Gradually lift the patient to the desired height, keeping a close eye on their comfort and well-being. Ensure that the sling is properly positioned, providing support to different parts of the body according to the patient’s needs.
Step 5: Transferring and Lowering the Patient
Carefully transfer the patient to the desired location, maintaining a smooth and controlled descent. Lower the patient gently, ensuring a seamless transition and minimizing any potential discomfort. Keep communication open with the patient to address any concerns during the transfer.
Step 6: Disengaging and Storing the Lift
Once the transfer is complete, disengage the lift’s controls and return the patient to a comfortable seated or lying position. Store the patient lift in a designated area, ensuring it is clean and ready for future use. Regular maintenance contributes to the longevity and reliability of the patient lift.
Types of Slings
1. Sling Type 1: Patient Lift Slings
Sling Type 1 from TLC Home Mobility is a versatile solution designed to work seamlessly with patient lifts. Offering full-body support, this sling accommodates a wide range of patients and transfer scenarios. Its ergonomic design ensures comfort and stability throughout the lifting process.
2. Sling Type 2: Home Mobility Slings
Sling Type 2 is tailored for home settings, prioritizing comfort and ease of use. With padded support for key areas and adjustable straps, this sling enhances the overall caregiving experience within a residential environment. Its user-friendly design ensures that caregivers can provide optimal support without compromising on comfort.
3. Sling Type 3: Sling Systems
Sling Type 3 represents advanced sling systems that cater to specific patient needs. With features such as contoured padding, multiple adjustment points, and quick-release mechanisms, this sling system provides adaptability and support for various transfer scenarios. Its durable materials and thoughtful design contribute to the safety and well-being of the patient.
Step-by-Step Guide: How to Use a Sling
Step 1: Selecting the Proper Sling
Choosing the right sling is crucial for ensuring a safe and comfortable transfer. Consider the patient’s mobility level, comfort requirements, and the specific lift being used. TLC Home Mobility provides guidelines for each sling type to assist in making the appropriate selection.
Step 2: Positioning the Sling
Position the sling carefully to provide optimal support to the patient. Ensure that the sling is snug but not overly tight, allowing for both comfort and security during the transfer. Adjust the sling based on the patient’s body shape and specific needs.
Step 3: Attaching the Sling to the Lift
Securely attach the sling to the patient lift, following the manufacturer’s guidelines. Double-check all connections to ensure that the sling is properly affixed, minimizing any risks during the transfer. TLC Home Mobility provides clear instructions for each sling type to facilitate this process.
Step 4: Lifting and Supporting the Patient
Activate the lift controls, gradually lifting the patient while providing additional support as needed. Communicate with the patient throughout the process to ensure their comfort and confidence. The sling should provide stable support, distributing the patient’s weight evenly.
Step 5: Adjusting the Sling for Comfort and Safety
Make any necessary adjustments to the sling during the transfer to enhance comfort and safety. This may involve slight repositioning or ensuring that the sling accommodates the patient’s specific body shape. TLC Home Mobility’s slings are designed with adjustable features to facilitate this step.
Step 6: Removing and Storing the Sling
Once the transfer is complete, carefully remove the sling from the patient. Properly store the sling, ensuring it is clean and ready for future use. TLC Home Mobility provides guidance on sling maintenance, including cleaning instructions and storage recommendations.
Conclusion
In conclusion, TLC Home Mobility‘s commitment to providing a comprehensive range of patient lifts and slings reflects their dedication to enhancing the caregiving experience. By understanding the types of lifts and slings available and following the step-by-step guides on their usage, caregivers can ensure a dignified, secure, and comfortable experience for individuals with limited mobility. Elevate your caregiving with TLC Home Mobility’s innovative solutions, fostering independence and enhancing the overall quality of care provided.